
Posted in Home, Pets, Photography | Tagged Ellie, Pets, Photography, Siberian Husky, Wordless Wednesday |
When I found this recipe, I thought it looked familiar and then I realized why. If you have ever made a Twinkie cake, this frosting is very similar to the filling. In fact, it may be the very same thing. This is a great frosting for “beginning decorators” kind of like myself. I can bake, but decorating cakes and cupcakes has never been my strong suit. My skills are improving a little and I think having the right piping tips helps as well. As you will see below, I listed the exact tips I used and the results I got. I will tell you my favorite at the bottom.
I found this version of frosting/filling at Our Best Bites. Their site is full of delicious looking food and other cute projects, so please check it out.
3 tbsp flour
1/2 cup milk
1/2 cup real butter, room temperature
1/4 cup granulated sugar
1 tsp vanilla

Whisk together the flour and milk. Heat in a small sauce pan on medium heat. Whisk continuously until it starts to thicken. Let is cook, while stirring, until it looks like pudding. You should be able to see the bottom of the pan when you stir it. Push the thick mixture through a mesh strainer to smooth then cool completely to room temperature. It has to be completely cooled to mix with the next ingredients.


In an electric stand mixer using the whisk attachment, beat the butter and sugar for about 2 minutes until well combined and fluffy. Add the thickened and cooled milk mixture and the vanilla. Beat on the highest speed for 7 minutes. Yep, that’s right, 7 whole minutes! I know that sounds like a lot, but it takes that long for this frosting to come together. If after 7 minutes, the texture is not right, keep beating it. It will eventually combine for a smooth and creamy frosting.
Here are the different icing tips I used and the results from them.


And here is one I messed up, so I just had to be the hero and get rid of it! Hee, hee!

My favorite tip, by far, is the 2D which is the first one shown. My next favorite is the 1M, which is the last one shown. The second one is ok, but I didn’t like the texture as well. I love the ruffles that the first tip creates!
For this edition of Thoughtless Thursday, I am going to write about something that is near and dear to my heart…COOKING! Specifically, these are my very favorite cooking utensils. I use these things the most when I am in the kitchen and I want you to know about them. Here is a little disclaimer first: These companies have no idea who I am and are not paying me a cent for my opinion. This is just that…my opinion. Ok, let’s get started!
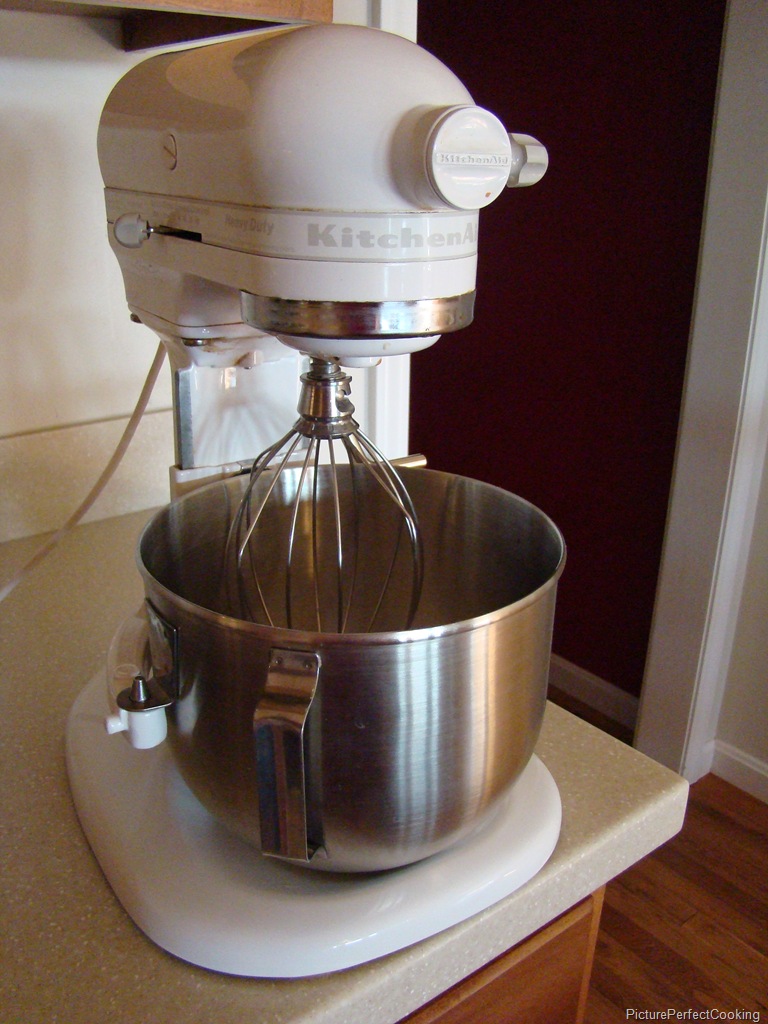
This machine has been my very best investment in the kitchen, and, when I say investment, I mean it. Kitchenaid mixers are not cheap, but they are the workhorses in the cooking world. I bought mine at least 16 years ago if not longer with tax return money, and I have never regretted the decision. I think this thing could mix concrete if you needed it to. I have basic white, but there are so many pretty colors to choose from. If this one ever gives out on me (heaven forbid), I think I will pick a bright color next time because I will definitely get another.
Next on my list are Oxo spatulas. I don’t know how Oxo does it, but these spatulas are perfectly weighted to make stirring so much easier. The handles are also ergonomically correct so they are gentle on your hands and wrists. I have three and they always seem to be dirty!

I bake a lot and I also travel with food quite a bit, so another of my must-haves are covered glass baking dishes. The brand is not so important here, but I love having different shapes and sizes to choose from. These are not only good for baking, but for serving, transporting, and storing food as well.

For stirring up light batters or small tasks like melting butter, I always reach for a glass mixing bowl. I have metal ones that I use occasionally, but I have always preferred glass. Again, this is one place where brand is not too important. I have Pyrex and Anchor Hocking and I like both brands just fine. Remember to try to get tempered glass though so there is less change of breakage.

Last, but certainly not least, are knives. These paring knives from Rada are my first line of cutting power. I have a Henckels block set that I use when I need bigger knives, such as a chef’s or bread knife, but these are perfect for everyday use. From slicing strawberries to cutting potatoes to wedging apples, these little beauties can to it all and more! Even better, they are only $4.90 each!!!

These are my favorites and I would love to hear what your favorites are. Maybe I can find my new favorite from yours!
Posted in Cooking, My Thoughts |

Back in 2009, not long after I started blogging, I published another post for Strawberry cupcakes here. Those recipes were really good, but I wanted to see if these would be better. I don’t know if they were better, but they were tasty. This recipe uses a combination of strawberry preserves and chopped strawberries for an extra little flavor kick that I really liked. Also, to make them look more “strawberry”, this recipe uses a tiny bit of red gel food coloring to tint them strawberry pink which is nice and pretty. If you don’t want to use the coloring, just leave it out since it does not affect the taste at all.
To top these, I used “Perfect Cupcake Frosting & Filling” from Our Best Bites, which I will spotlight next week. The cupcake recipe itself is from Yummy Cakes By Lynn. You can check out her site right here.
2 tbsp strawberry jam or preserves
1/4 cup finely chopped strawberries
1 1/4 cups all purpose flour
1 1/4 tsp baking powder
1/4 tsp salt
3/4 cup granulated sugar
1/4 cup unsalted butter, room temperature
3 large egg white, room temperature
1/4 tsp vanilla
4 drops red food coloring
1/3 cup milk

Preheat oven to 350 degrees and position a rack in the middle of the oven.
In a small bowl, stir together jam and chopped strawberries. In a second bowl, whisk together flour, baking powder and salt.


Using a mixer, beat the sugar and butter until light and fluffy, about 2-3 minutes. Add the egg whites, vanilla and food coloring and beat until combined.

Add the flour mixture in 3 additions, alternating with the milk in 2, beating on low speed until just combined. Scrape the sides of the bowl as needed. Fold in strawberry mixture until just combine.


Fill the cupcake liners about 3/4 full. Bake for about 25 minutes, until centers bounce back when touched. Let the cupcakes cool in the pan for 5 minutes then transfer them to a wire rack to cool completely.


Check back next week for the frosting recipes and finished photos!
Posted in Cooking | Tagged Cupcake, Dessert, Strawberry |
I have mentioned before that Alton Brown is my favorite Food Network personality. He always makes the recipes interesting by explaining the history and science behind the ingredients and methods. This recipe was on an episode a couple of months ago and it looked so rich and decadent. I am not a big fan of boxed devil’s food cake mixes so I was a little hesitant, but I still had to give it a try and I was not disappointed!
The cake is rich and moist and the frosting is just light enough that it balances out the cake perfectly. I do have one little note about this recipe. Mr. Brown’s calls for Dutch processed cocoa which I did not have and couldn’t find in my local grocery stores so I substituted normal baking cocoa. Since the pH is very different between the two, I added about 1/2 tsp of baking powder to even it out a little. I have since ordered Dutch processed from Penzey’s Spices so I will be trying this again to see if it makes a difference. Also, please remember that Mr. Brown does his measurements by weight, not volume, so break out that kitchen scale. These are pretty long recipes, so I am going to list the complete recipes and then add the photos at the bottom.
For the Cake:
Nonstick spray
1 cup boiling water
4 ounces Dutch process cocoa
10 1/2 ounces dark brown sugar
5 1/2 ounces all-purpose flour
4 ounces cake flour
1 teaspoon baking soda
1/2 teaspoon kosher salt
1 cup vegetable oil
4 1/2 ounces sour cream, room temperature
2 large whole eggs, room temperature
2 large egg yolks, room temperature
Set a rack in the middle of the oven and preheat to 325 degrees F. Spray a 13 by 9-inch metal pan with nonstick spray.
Whisk the boiling water and cocoa powder together in a small bowl and set aside. Combine the sugar, flours, baking soda, and salt in the bowl of a stand mixer fitted with the paddle attachment. Whisk the oil, sour
cream, eggs, and egg yolks in a large pourable vessel. Add the oil mixture to the cocoa and water mixture and slowly whisk to combine.
With the mixer on low speed, add the liquid mixture to the dry mixture over 30 seconds. Continue to beat on low speed for another 30 seconds. Stop and scrape down the sides of the bowl. Continue to beat on low speed until the batter is smooth, 10 to 15 seconds.
Pour the batter into the prepared pan and bake until the cake springs back when pressed and reaches an internal temperature of 205 degrees F, 30 to 35 minutes. Cool in the pan on a rack for about 1 hour and then frost.


For the frosting:
5 1/2 ounces unsalted butter, room temperature
1 ounce mayonnaise
3 ounces semi-sweet chocolate, melted and cooled slightly
8 ounces powdered sugar
Pinch kosher salt
Beat the butter and mayonnaise in the bowl of a stand mixer fitted with the paddle attachment, on high, until light and fluffy, 3 to 4 minutes. With the mixer on low, slowly add the melted chocolate. Continue mixing on low speed until all of the chocolate is incorporated, stopping to scrape down the sides of the bowl as needed.
Turn off the mixer and add one-third of the sugar. Mix on low to combine, stopping to scrape down the sides of the bowl. Repeat until all of the sugar has been incorporated. Add the salt and continue to beat until the frosting is smooth and lightens slightly in color, 2 to 3 minutes.
Use immediately or store in an airtight container at room temperature for up to 4 hours or refrigerate for up to a week. Bring to room temperature before using chilled frosting.


I am linking this recipe at Foodie Friday by Designs by Gollum and Sweet Tooth Friday by Alli-N-Son.
Posted in Cooking | 12 Comments »
For today’s Thoughtful Thursday post, I thought I would share a little tutorial on how I create the flower pots that decorate our home during the summer. I love to garden and I come from a long line of flower lovers! My nanny (maternal grandmother) has many flowers around her house and geraniums are one of her favorites. It seems that she has passed that love down to me because I always use them in my pot designs.
We have red metal chairs on our front porch so I usually do a red, white, and blue theme for the pots on that. For the deck pots in the back of the house, I decided to go a bit bolder by using hot pink, purple and white.
This year I purchased Rocky Mountain Violet and Rocky Mountain Dark Red zonal geraniums as the base plants with the following as my fillers: For impact in the back of the pots, I used spikes in all of the containers. For the front porch, I also used Mealycup Sage (Salvia) in Sallyfun Blue; and for the back porch, I used Angelonia (Summer Snapdragon) Alonia White. To fill in the sides, I used Diamond Frost in all of the pots. I still needed something that would drape over the front so I chose Scaevola (Fan Flower) Bombay Dark Blue for the front and Calibrachoa Callie Dark Blue for the back.

To make the pots easier to move around, I used a trick my mom taught me. Fill the pots about halfway with pieces of Styrofoam and then add the potting soil. It works like a charm every time!

Now it is time to add the soil. Fill up the pot to about 3 or 4 inches of the top and then “dry fit” the plants to your satisfaction.

Once the flowers are placed where you want them, fill in around the root balls with potting soil and gently press everything together. Place your pots in their location and water well. I try to water these every day and fertilize at least once a week, if not twice.


Posted in Gardening, My Thoughts | 2 Comments »
